I got this pillow with a blanket for Christmas. I ended up just taking it to my classroom since I didn't really know what to do with it. This week I decided I would re-cover it. So, I bought two white shirts from the dollar store. I cut out a 15x15 square. I was pleasantly surprised that my pillow was just a tad smaller than my quilting ruler, so I just cut out perfectly around it :) Out of the second shirt I cut off the bottom hem and tossed it. Then I cut a strip that was about 3 inches. Since it was off the bottom of the shirt it was like a tube. I cut it so that it made one long strip and then did a ruffle stitch down the middle.
I pinned it in the middle of one of my squares and then did a straight stitch down the middle.
I cut another strip about 1 1/2 inches, cut to make it one long strip. I pin it in the middle of the ruffle and sew around the perimeter.
Then I sew down the edges of the ruffle.
At this point I sew on buttons if I want them. then I pin right sides together and sew, leaving a hole large enough to turn right side out and stuff in the pillow.After the Pillow is in, I stitch it closed and ..... cute pillow!
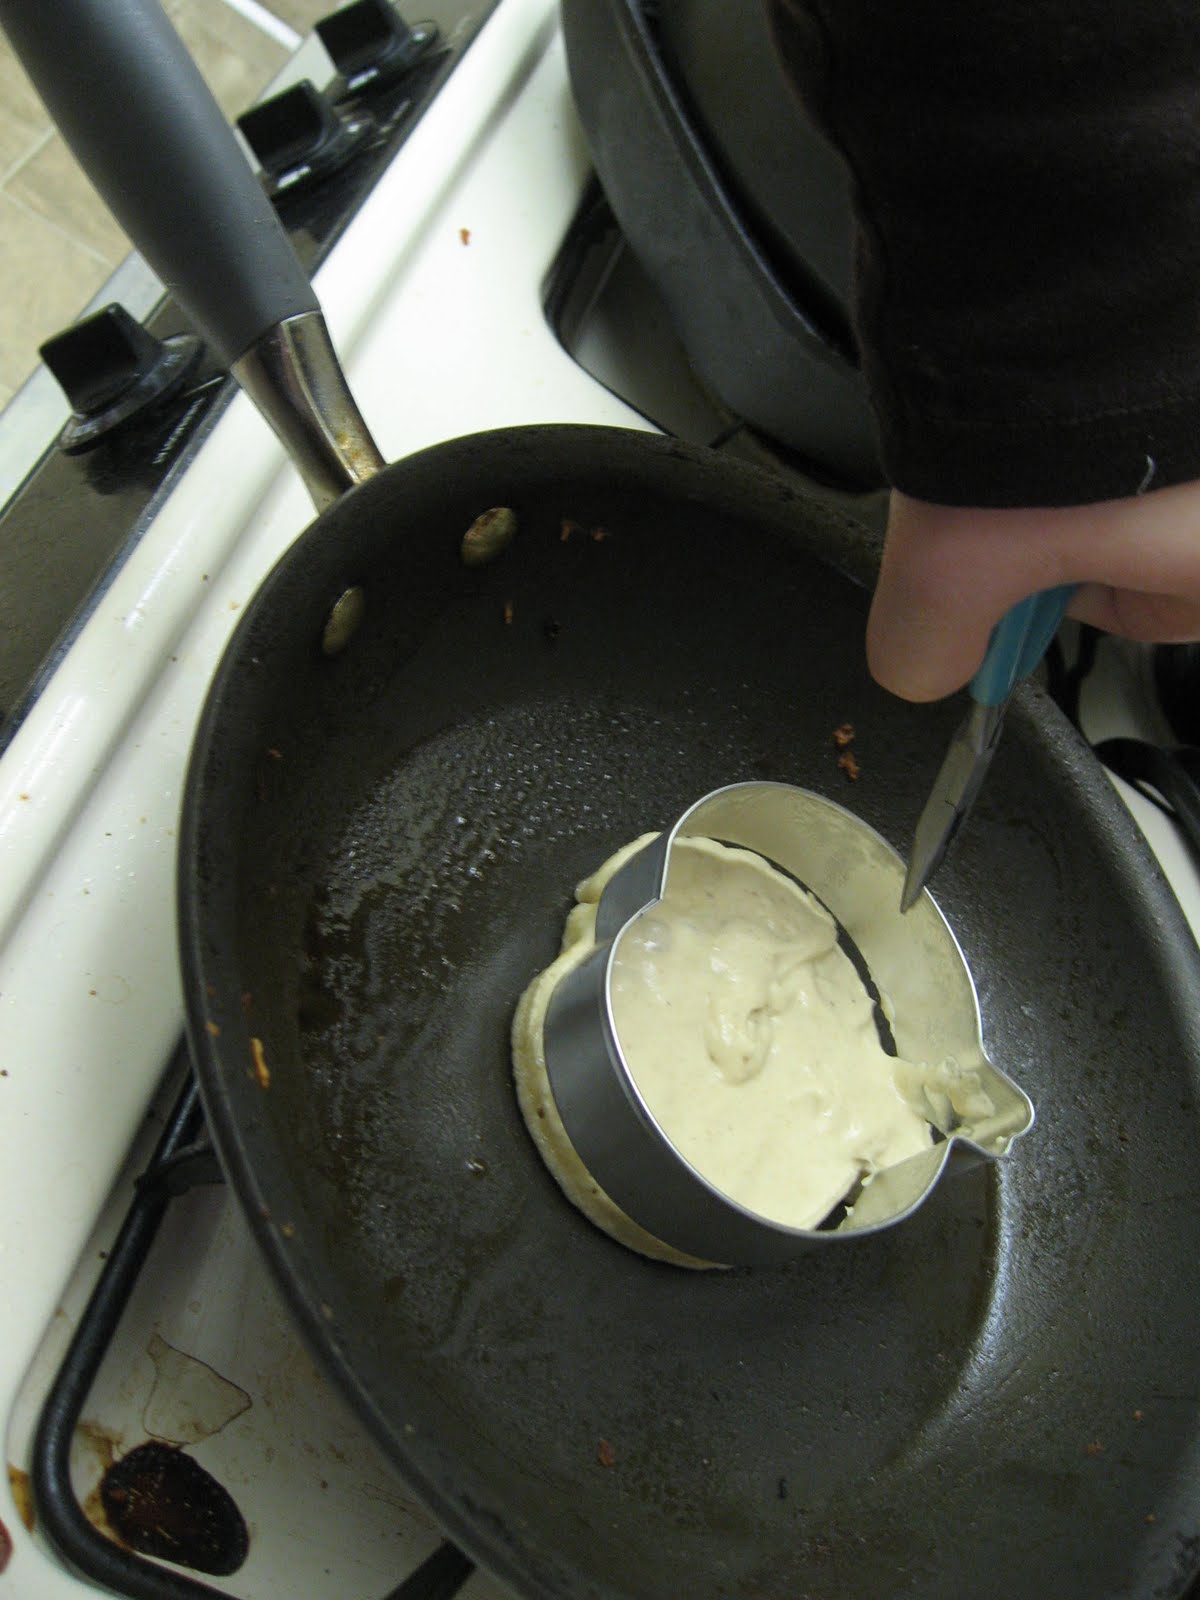
Don't fun shaped pancakes just make you smile! My mom gave me this fun little pancake shaper thing. You probably have already guessed that she gave it to me for Valentine's day... and now months later I finally decided to use it. As I was using it I thought to myself... this is just a cookie cutter with an easy way to pick it up! So that gave me an idea. Why not just use a cookie cutter and a pair of needle nose pliers? So I did. Now don't laugh... yes I know it is now spring and no longer fall... but I am a Kindergarten teacher and most of my cookie cutters are at work. So yes... I know it is a pumpkin, but hey, it will do the job. Be sure to spray it with non-stick spray before you begin, put it on the skillet and then pour in the batter. Remove the cookie cutter with the pliers before you flip the pancake and.... Bam!! fun shaped pancake without the need of an over priced silly device.
I have so many friends who are having babies! These are the burp cloths that I have been making... so if you are pregnant and my friend.... then stop reading :)
I bought a large pack of reusable diapers at Babies R Us. The re-usable diapers have a thicker part in the middle. I measured this part and then cut out a piece of fabric that was that size with about 1/4 inch extra all around. If it is a fabric that will run, then I would do a zig zag stitch around the entire perimiter before donig anything else. I then place the fabric on the diaper and tucked the edges in and pinned.
I did a straight stitch all the way around the outside, close to the edge. I then did another stitch about 1/4 inch in, simply because I thought it looked nicer. If you try this hopefully you sew straighter than I do :) Hey, I always say that if it isn't perfect, then people will know that I took the time to make it myself for them :)
I got fancy on some... and even added ruffles on one! I made some of them out of old T-shirts. Not only does it make the burp cloths cute, but it is also another way to be green through re-purposing!
I was at my friend's house the other day and she was talking about how she has so many plastic grocery bags and needed to find something to keep them all in. We were celebrating her birthday a few days later so I got busy :) I can now post the tutorial since I have delivered the gift.
First I cut out a piece of fabric. I want to guess it was about 14x16" (I didn't measure) Then I cut out another piece that would serve as my strap to hang it by. This was about 3x15" I took the large piece, but right sides together and did a zigzag stitch down one side to make a tube then I took each end, folded it down 1/4 inch and sewed a zigzag stitch. I folded it again about 1/2 an inch. This time I used a straight stitch since it would show on the pretty side and i left about 1" not sewn so that I could thread the elastic through. To thread the elastic through the tube I just made, I attached a large safety pin to one side and used it to guide the fabric in. It was actually really easy.
Once the elastic was out the other side, I pulled it until the opening to my trash bag holder was all gathered up to the size that I wanted. Then I sewed the two ends of the elastic together. Then finished closing up around the elastic. (do this on both sides)
Now for the strap. I put right sides together and did a zig zag stitch down. then I used a safety pin on one end to help feed the tube right side out.
Attach the straps and..... trash bag holders! the other one I did was a little longer and I think turned out a little better. But hey, it all depends on how big you want it :)
I don’t know about you but the high increase in those who have asthma and respiratory problems has me a little concerned.Living in a place that has poor air quality got me looking into ways to keep both me and my family the most healthy.Apparently there is this thing called “sick building syndrome”.New buildings are energy efficient, but apparently this is not good as far as air quality goes.So if you are in a drafty house, your air quality is probably better than in a new home or building.Imagine that!!!One way to help combat this is with plants in your home.
Although all plants that are indoors are beneficial, NASA and other research has found that some are better at scrubbing chemicals out of the air and producing oxygen than others.Apparently soil and roots of these plants are also important as the chemicals act as a food for the plant so the more exposure the soil has to the air the better.(make sure low leaves are trimmed to increase soil/air exposure)
If you are starting with just a few plants, here is a good place to start.This is according to the website: The Secrets to Longevity (website at bottom)
Top three oxygen producing plants:
1.Sprouts: Grow your own sprouts for food and oxygen! (especially sweet pea sprouts, buckwheat sprouts and sunflower sprouts) You will also get nutrients and good things when you eat them!
2.Snake Plant a.k.a. Mother-In-Law’s Tongue: This one is really cool!It takes Carbon Dioxide and converts it to Oxygen at night which makes it great for your bedroom.Get this:all you need is 6-8 plants that are waist high per person if you needed to survive in a sealed room!Well that and the Areca Palm so that you could breath during the day.The snake plant also removes formaldehyde from the air.Not to mention that they look cool J
3.Areca Palm: This plant removes Xylene and Toluene from the air.It also turns a lot of Carbon Dioxide into Oxygen during the day. Having four (shoulder high plants) of these per person in your house can produce enough oxygen to survive on during the day! They need to have dust and grime wiped off of their leaves once a week, or more often if the air quality is really, really bad where you live.
Top three air cleaning plants:
1.Madagascar Dragon Tree a.k.a. Red Edged Dracaena: This is a low maintenance house plant and is best at removing benzene, formaldehyde, xylene and toluene from the air. It cannot tolerate direct sunlight yet it does well in fairly well indirectly lit areas. It is more susceptible to becoming damaged from over watering than infrequent watering. (perfect for me)
2.Warneck Dracaena: A very popular indoor plant.Removes benzene, trichloroethylene, xylene and toluene from the air.
3.Peace Lily: This species (of which there are a variety of sub-species grows best in the shade .Only water it about once a week and make sure the water is chlorine free. Never let the soil go completely dry. This house plant removes benzene, formaldehyde, acetone, amonia and trichloroethylene from the air. It also periodically flowers!
Want to know more?
Here are NASA’s findings (with a few things I have found):
The NASA studies recommend that you use 15-18 plants in 6-8 inch pots to improve the air quality in a house 1800d sq. ft. The better the plants grow, the better they are cleaning your air.Here are the plants that NASA recommends (I added some other information that I discovered while researching):
Hedera helix English ivy
This one can be poisonous to animals.Someone online said that her vet suggested spraying the plant with water and then sprinkling ginger on it.The animals stay away from plants they previously enjoyed chewing.
Toxic if eaten by children as well
Prefers well drained soil
Chlorophytum comosum spider plant
One of the top three plants for removing formaldehyde
Prefers well drained soil
Epipiremnum aureum golden pothos
Spathiphyllum `Mauna Loa' peace lily
Lilys are also toxic to cats, sometimes even from just rubbing against them so be careful.
NASA also noted that some plants are better than others in treating certain chemicals.
For example, English ivy, gerbera daisies, pot mums, peace lily, bamboo palm, and Mother-in-law's Tongue were found to be the best plants for treating air contaminated with Benzene.
The peace lily, gerbera daisy, and bamboo palm were very effective in treating Trichloroethylene.
Additionally, NASA found that the bamboo palm, Mother-in-law's tongue, dracaena warneckei, peace lily, dracaena marginata, golden pathos, and green spider plant worked well for filtering Formaldehyde.
Chemicals Used in the NASA study:
Trichloroethylene (TCE) is a commercial product found in a wide variety of industrial uses. Over 90 percent of the TCE produced is used in the metal degreasing and dry cleaning industries. In addition, it is used in printing inks, paints, lacquers, varnishes, and adhesives. In 1975 the National Cancer Institute reported that an unusually high incidence of hepatocellular carcinomas was observed in mice given TCE by gastric intubation and now considers this chemical a potent liver carcinogen.
Benzene is a very commonly used solvent and is also present in many common items including gasoline, inks, oils, paints, plastics, and rubber. In addition it is used in the manufacture of detergents, explosives, pharmaceuticals, and dyes.
Benzene has long been known to irritate the skin and eyes. In addition, it has been shown to be mutagenic to bacterial cell culture and has shown embryotoxic activity and carcinogenicity in some tests. Evidence also exists that benzene may be a contributing factor in chromosomal aberrations and leukemia in humans. Repeated skin contact with benzene will cause drying, inflammation, blistering and dermatitis.
Acute inhalation of high levels of benzene has been reported to cause dizziness, weakness, euphoria, headache, nausea, blurred vision, respiratory diseases, tremors, irregular heartbeat, liver and kidney damage, paralysis and unconsciousness. In anima tests inhalation of benzene led to cataract formation and diseases of the blood and lymphatic systems. Chronic exposure to even relatively low levels causes headaches, loss of appetite, drowsiness, nervousness, psychological disturbances and diseases of the blood system, including anemia and bone marrow diseases.
Formaldehyde is a ubiquitous chemical found in virtually all indoor environments. The major sources which have been reported and publicized include urea-formaldehyde foam insulation (UFFI) and particle board or pressed wood products used in manufacturing of the office furniture bought today. It is used in consumer paper products which have been treated with UF resins, including grocery bags, waxed papers, facial tissues and paper towels. Many common household cleaning agents contain formaldehyde. UF resins are used as stiffeners, wrinkle resisters, water repellents, fire retardants and adhesive binders in floor coverings, carpet backings and permanent-press clothes. Other sources of formaldehyde include heating and cooking fuels like natural gas, kerosene, and cigarette smoke.
Formaldehyde irritates the mucous membranes of the eyes, nose and throat. It is also a highly reactive chemical which combines with protein and can cause allergic contact dermatitis. The most widely reported symptoms from exposure to high levels of this chemical include irritation of the eyes and headaches. Until recently, the most serious of the diseases attributed to formaldehyde exposure was asthma. However, the Environmental Protection Agency (EPA) has recently conducted research which has caused formaldehyde to be strongly suspected of causing a rare type of throat cancer in long-term occupants of mobile homes.
For an average home of under 2,000 square feet, the study recommends using at least fifteen samples of a good variety of these common houseplants to help improve air quality. They also recommend that the plants be grown in six inch containers or larger.
Here are some tips for keeping your plants healthy and thus, keeping you more healthy according to the longevity website:
·Avoid placing them in corners with stagnant or no air flow or by radiators that produce excessive heat which can damage them.
·Indirect sunlight is best for the air cleaning plants mentioned (because they are mostly shade growing jungle plants) but other types of flowering plants will usually need some direct sun.
·Take them outdoors at least every couple of months for a day or two.
·Clean or dust their leaves about once a week, more often in a dirty city.
·Over-watering is more harmful than under-watering, allow the soil to get fairly dry between waterings (except for the peace lily and your sprouts).
·Mist the leaves since these are jungle plants that like humidity.
·Use an organic fertilizer on occasion such as diluted ocean water, seaweed extract and/or pour the soak water into the soil of your plants left over after germinating your nuts, seeds, grains, legumes and sprouting seeds.
I find this kind of thing very interesting!It makes me want to go and buy more plants… but space is always my downfall.Hopefully I will have a house in a few months and I will be able to have more plants.I listed the websites where I got my information if you want to do some more research or read the full articles.
Here is a list of resources for more information:
PDF files of the NASA studies related to plants and air quality:
So I have been inspired by Disney at Ruffles and stuff to re-fashion cloths I don't wear into something that I might wear. I had this tank top that was way too short and boring.
this is what I started with this boring too short tank and pillow case: I cut up the pillowcase and made tons of ruffles
So I went a little bit ruffle crazy. I learned how to make them about a week ago and I think they may be my new obsession. I am not sure how I like the bottom, but hey, it is better than what I started with so I will take that as a win!
I was at a craft store and fell in love with this string of beads. They were my favorite color (green of course) and I couldn't help but buy them. I brought them home and turned this strand of beads into a necklace. Here is how I did it:
1. Cut a length of tiger tail wire a little bit longer than you want it. 2. String a crimping bead and a clasp onto the end of the wire 3. loop the wire around the clasp and back through the crimping bead. Leave about 1 inch of a tail. Use needle nose pliers and squish the crimping bead firmly. 4. Start stringing the beads making sure you string the beads through the wire and the tail as well so that it doesn't show.
5. When you are done stringing the beads, end with another crimping bead and the other end of the clasp. Trim the tail so that there is about 1 in. of room.6. Loop around the end clasp and back through the crimping bead and through the beads so that the tail is hidden within. Make sure that the tail doesn't poke out between any beads.
7. Use the needle nose pliers and crimp the bead (squish it) firmly.
I did a second row the same way as the first... and enjoy!!!
My last post gave me inspiration to lay out all the benefits of things we all have in our cupboards and pantries. No need for those harsh chemicals, these are natural solutions to your everyday cleaning needs.
most of this information came from an issue of Real Simple magazine/ April 2009
Vinegar Vinegar is acidic and can wipe out tarnish, soap scum, mineral deposits, and more. Safe if accidentally ingested
The down low: Distilled white vinegar creates an environment that inhibits the growth of mold, mildew,and some bacteria such as E. coil and salmonella.
Uses: coffeemaker: pour equal parts vinegar and water into the machine's water chamber, then switch on the brew cycle. Halfway through turn off the coffee maker and let the solution set for about an hour. Turn it on again to complete the cycle, then run several cycles with clean water
Dishwasher: To disinfect the interior of the machine, pour 1/2 c. vinegar into the reservoir and run an empty cycle, or place a small bowl filled with vinegar on the bottom rack and run an empty cycle.
Drains: Clean drains and pipes by pouring vinegar down them. After 30 minuets flush with cold water.
clogged drains: to clear a clog, p
Floors: Add 1/4 c. vinegar to a bucket of warm water to lean almost any type of floor except for marble or wood as it can scratch or strip them.
Glassware: For spotless hand-washed glasses, add 1 c. vinegar to the rinse water.
Moldy walls: Spray vinegar on the affected areas. After about 15 minuets rinse and let dry thoroughly
Shower heads: To combat mineral deposits, pour vinegar into a plastic grocery bag and knot the handles over the neck of the shower head, securing with rubber bands. Let soak overnight. Rinse with water in the morning.
Steam iron: To get rid of mineral deposits, fill the iron with equal parts vinegar and water; press the steam button. Turn off and let cool, empty, and rinse.
Windows: 1/2 and 1/2 vinegar and water with a squirt of castile soap. (see last post)
Baking Soda the down low: Baking soda can absorb oders, cuts through grease and grime as well as scours, and is safe to be ingested.
Uses:
can opener: dip a toothbrush into a paste of 2 Tablespoons baking soda and 1 tsp. water, then scrub
bath tub: Make a paste with baking soda and water. scrub. add vinegar and scrub (it will fizzle, but it helps get up the dirt) rinse.
Stained teacups and coffee mugs: Fill with 1 part baking soda and 2 parts water and soak overnight; rub with a sponge and rinse
upholstered furniture: To remove oders, sprinkle baking soda on fabric, then vacuum
Scuffed Walls: Erase crayon marks by applying a baking soda paste (equal parts baking soda and water) to white painted walls (baking soda may dull colored walls) Let dry before brushing it with a clean cloth.
liquid Castile soap though milder than the bar you later up with, it can tackle even caked-on mud.
the down low: like other soaps, this plant based version efficiently loosens grime and dirt from surfaces, but it is gentler, so it won't hurt or dull them.
uses: car: mix 1/4 c. liquid castile sop with hot water in a bucket and fill almost to the top. Use to wash then rinse
Floors: You can mop almost any type of floor with a solution of 1/4 c. liquid castile soap and 2 gallons warm water. If the floors are greasy, add 1/4 c. distilled white vinegar to the bucket.
Leather and upholstery: Add 2 drops liquid Castile soap to 1 quart warm water. Apply to the leather with a barely moils sponge
Marble counter tops: Stir 1 Tbsp. liquid Castile soap into 1 quart warm water. Dampen a cloth with the solution and wipe the surface. Rinse, then dry with a clean cloth.
Sinks, showers, Tubs, and ceramic tile: Create a homemade soft scrubber by combining 1 Tbsp. liquid Castile soap and 1/3 c. baking soda.
Stove top and vent hood: Add a few squirts of liquid Castile soap to 2 c. hot water. Apply to he stove top, the burners, and the vent hood to cut through accumulated grease.
Essential Oils: Leave behind a spotless, deliciously scented room with these multitasking aromatic oils.
The down low: Extracted from plants, some essential oils can kill bacteria and mold. They are strong so don't over do it.
uses: combs and brushes: Fill a container with 1 1/2 c. water and 1/2 c. distilled white vinegar, and 20 drops tea-tree, lavender, or eucalyptus oil. Soak combs and brushes for 20 minuets. Rinse and air dry.
scuffed floors: Apply two to four drops of tea-tree oil to the spots. Wipe excess oil with a cloth and rub in distilled white vinegar.
Gum encrusted items: Orange oil is great at removing this sticky offender from various materials and it shouldn't stain fabrics. Be sure to wash immediately.
Shower doors: Wipe scum-covered glass doors with a few drops of lemon oil twice a month. It will protect them from grime buildup.
Toilets: Add 2 tsp. tea-tree oil and 2 c. water to a spray bottle. Shake, then spritz along the toilet's inside rim. Let sit for 30 minuets; scrub. You can also place a few drops of your favorite oil on the inside of the toilet-paper tube.
Windows: Mix 2 oz water and 10 drops lavender or lemongrass oil to wipe grime off windows. Bonus, these repel flies.
warning: lavender can be toxic to cats
cooking oils Just a few drops will polish furniture or your leather pumps.
the down low: vegetable and plant-based oils, such as olive and sunflower oil, dislodge dirt, diminish scratches and imperfections, and hydrate wood.
uses: cast-iron pans: make a scrubbing paste with vegetable oil and a tsp. of coarse salt to combat cooked-on debris, then rinse with hot water.
Hands: to get paint off your skin, rub with vegetable oil, then wash thoroughly with soap.
leather shoes: Wipe away dirt with a damp sponge, then apply a drop of vegetable oil to a soft cloth and rub the surface to remove scuff marks. Buff the shoes with a chamois to a shine.
Rattan and wicker furniture: To prevent rattan and wicker form drying or cracking, lightly brush them with vegetable or sunflower oil and gently rub in with a cloth. Warm the oil on the stove first to thin it and make it easier to apply.
stainless-steel surfaces: for sparkle, pour olive oil into a cloth and buff.
Wood Furniture: Make your own polish by mixing 2 c. olive or vegetable oil with the juice of 1 lemon; work it in with a soft cloth. To smooth out scratches in light-colored wood, bub them with a solution of equal parts olive or vegetable oil and lemon juice.
Borax down low: When added to a wash, borax makes detergents even more effective
use: Baseboards, counter tops, and walls: Dissolve 1/2 c. borax in 1 gal. hot water and pour the solution into a spray bottle (which can be stored in a spray bottle). Spritz generously, wipe down with a damp cloth, and let air dry.
china (including hand painted): soak china in a dishpan filled with warm water and 1/2 c. borax; rinse well
Dishwasher: If the machine is smelling, sprinkle borax in the bottom, let sit overnight, them wipe down with a damp sponge.
Pots and pans: Rub borax into cookware with a damp sponge, rinse well.
Toilet: Pour borax in the bowl and let sit overnight. Swish the bowl a few times with a toilet brush and flush the next day.
lemons The down low: the acid in lemon juice removes dirt and rust stains. It's especially effective when mixes with salt, which makes a great scouring paste.
Counter tops: Dip the cut side of a lemon in half in baking soda to tackle counter tops; wipe with a wet sponge and dry. Don't use on delicate stone like marble or stainless steel (it may discolor)
dishes: To increase the grease cutting power of your dish washing detergent, add a tsp of lemon juice.
faucets: combat lime scale by rubbing lemon juice onto the taps and let sit overnight. Wipe with a damp cloth.
Garbage disposal: cut a lemon in half, then run both pieces through the disposal.
Grout: Add lemon juice to 1 to 2 tea cream of tartar to make a paste. Apply with a tooth brush and rinse
Hands: When you touch raw fish, rub your hands with lemon juice to get rid of the oder. (they also sell these metal bars you can rub on your hands to do the same thing)
laundry: To brighten whites add 1/2 c. lemon juice to the rinse cycle for a normal size load.
Plastic storage containers: To bleach stains rub lemon juice on the spots and let them dry in a sunny place, then wash as usual. I use Pyrex storage containers with plastic lids so that when I heat them I don't add toxins to my food.
Table Salt use: Artificial flowers: Place the fake blooms inside a paper bag and pour in salt. Close the bag and shake vigorously. The salt will dislodge accumulated dust and dirt.
Glassware: salt won't scratch he way a scouring pad can. To get out stains use salt for extra abrasion.
Greasy pots and pans: Sprinkle salt on cookware to absorb excess grease. Dump out the salt before washing (don't use on non stick)
spills in the oven: If something bubbles over, pour salt on the spill to soak it up. When the oven is cook, wipe it with a damp sponge.
Stained coffee and tea cups: Sprinkle salt on the outside of a lemon peel; rub until clean
Wooden counters and tables: cover grease splatters with salt to absorb as much as possible. Let absorb for an hour then wipe up.
Toothpaste The down low: the combination of a mild abrasive, a surfactant (detergent), and an antibacterial agent makes toothpaste a potent stain-fighter.
uses: Acrylic accessories: squeeze toothpaste onto a toothbrush and work it into scratches until they diminish. Wipe residue off with a cloth.
Chrome fixtures: To polish faucets and taps in the kitchen or bath, smear a dime size amount of toothpaste onto them, then buff with a soft cloth until they shine.
scuffed linoleum: Reduce marks by scrubbing them with toothpaste and a dry cloth until no residue remains.
piano keys: Rub each key carefully with a damp cotton swab and a dollop of toothpaste. Wipe dry and buff with a clean cloth.
Tarnished silverware: Put a dab of toothpaste on a soft cloth, rub it onto the tarnish, then rinse with water and dry.
Steam iron: mineral deposits can stain an iron's sole plate. Apply a dab of toothpaste and work it into the plate. Use a clean cloth to remove residue.
A Few More Tips: Glycerin: remove dried wax. Pick off as much dried wax as possible, moisten cotton ball with glycerin and rub until clean
Club Soda: use to shine scuffed stainless steal sink. Buff with a cloth dampened with club soda. then wipe dry with another clean cloth.
Hydrogen peroxide: disinfect keyboard. Dip a cotton swab in hydrogen peroxide to get into the nooks and crannies.
corn starch: clean grease spills on carpet. Pour cornstarch onto spots and let sit 15-30 minuets before vacuuming.
rubbing alcohol- erase permanent marker stains from finished wood floors or solid surface counter tops, pour rubbing alcohol onto a cotton ball and apply.
white bread: dust an oil painting. Gently dab a slice of white bread over the surface to pick up dirt and grime.
ketchup: remove tarnish from copper and brass cookware. Squeeze ketchup onto a cloth and rub it on pots and pans. They should go back to their coppery color in minuets. Rinse with warm water and dry with a towel.
oatmeal: Use to scrub very dirty hands. Make a thick paste of oatmeal and water; rinse well.
Rice: clean the inside of a vase or thin necked bottle. Fill three quarters of the vessel with warm water and add a Tbs. of uncooked rice. Shake vigorously.
Tea: Scour rusty garden tools. Brew a few pots of strong black tea. When cool, pour into a bucket. Soak the tools for a few hours. Wipe each one with a cloth.
This has given me insporation to clean. Imagine that! I better take this opportunity while it is here.

 I cut out a 15x15 square. I was pleasantly surprised that my pillow was just a tad smaller than my quilting ruler, so I just cut out perfectly around it :)

 I cut another strip about 1 1/2 inches, cut to make it one long strip. I pin it in the middle of the ruffle and sew around the perimeter.


 After the Pillow is in, I stitch it closed and ..... cute pillow!